Iframe embed and custom chat page
Hi! 👋 This guide will show you how you can embed the chat widget into an iframe to create a custom direct chat page.
As of yet, default LiveChat chat page (Chat page explained | LiveChat Help Center) offers limited customization.
If you’re interested in a page like this but also would like for it to look different - this guide is for you. It will also be useful if you’re interested in an embed of the chat window in a static place on your website.
Video and page example
Working example of the implementation can be found at https://jjfrzw.csb.app.
Steps
1. First thing we’ll need to do it is get your LiveChat account’s license number - simplest way is to head here.
(Settings → Channels → Chat page) in the LiveChat application your license number is the 6-8 digits at the end of the URL:

next, please replace the XXXXXX in the following link: https://secure.livechatinc.com/licence/XXXXXX/open_chat.cgi
with your license number like so: https://secure.livechatinc.com/licence/9720060/open_chat.cgi
(feel free to visit the link you’ve just made to see how what we’ll be embedding on the page looks like)
2. Now that we have the link we can place it in an iframe. Iframe is a tag that allows us to embed a document within an existing document. In this case we’ll be embedding the page accessible via link we just created inside of your custom page as per below example:
<iframe src="[https://secure.livechatinc.com/licence/9720060/open_chat.cgi](https://secure.livechatinc.com/licence/13017213/open_chat.cgi)" width="600px" height="600px"></iframe>
This should be implemented into <body> tags on your website - iframes act like a regular HTML element so please bear in mind where in the body of your website you implement it, will define the iframe position on your website.
- src defines url of the page we want to embed
- width and height define sizing of the embed
3. With that done you should have the chat window visible on your website but it’s pushed to the side so it doesn’t look very professional so lets center it.
To do that we’ll need to put our iframe in a <div> as shown here:
<div id="iframecontainer">
<iframe src="https://secure.livechatinc.com/licence/13017213/open_chat.cgi" width="600px" height="600px"></iframe>
</div>
You can adjust the ID of our div freely, but in CSS I’ll be referring to the div with id “iframecontainer”, if you change the ID of the div - please adjust the CSS accordingly.
Let’s add following lines to the CSS of the page:
#iframecontainer{
display: flex;
align-items: center;
justify-content: center;\
}
This will make sure that elements inside of div “iframecontainer” are aligned to the center - after reloading the page you should see the effect.
4. You can also style the iframe itself, in my case I have applied a border property to give the chat window a nice border and a box-shadow to give it a slicker look using following CSS:
iframe {
border: 5px solid black;
box-shadow: 8px 10px #575357;
}
Please bear in mind that this CSS will apply to all iframes on your website so if you have other iframes, it’s best to give our iframe an ID and then use CSS of the ID of the iframe instead of “iframe” property itself.
Here’s how the final script should look like in HTML:
<div id="iframecontainer">
<iframe id="chatwidgetiframe" src="https://secure.livechatinc.com/licence/13017213/open_chat.cgi" width="600px"
height="600px"></iframe>
</div>
and CSS:
#chatwidgetiframe {
border: 5px solid black;
box-shadow: 8px 10px #575357;
}
#iframecontainer{
display: flex;
align-items: center;
justify-content: center;
}
With that done - our implementation is complete, you can go ahead and customize the overall look of the page up to your preference! 🙂

Direct chat link custom variables and parameters
You can load some additional information or settings into your chat widget using the direct chat link. The details that can be loaded are:
- Customer name
- Customer email
- Group ID
- Unique groups setting
- Custom variables
Customer name
The basic format of the direct chat link is:
https://secure.livechatinc.com/licence/13017213/v2/open_chat.cgi
The string of digits there is our LiveChat license ID. We can set the customer's name in your LiveChat using the direct chat link by adding the name= parameter to it. Remember to put the ? right after open_chat.cgi.
The name needs to be encoded to match the URL format. If you would like the name to be John Smith, your parameter should be name=John%20Smith. In the URL encoding, %20 represents the space between the names. If you are not familiar with URL encoding you could use some online encoder, for example https://www.browserling.com/tools/url-encode.
The example link looks like this:
https://secure.livechatinc.com/licence/13017213/v2/open_chat.cgi?name=John%20Smith
Customer email
If you would like to load your customer's email using the direct chat link, you need to add email= parameter to it. If you would like the email to be j.smith@test.com, your parameter should be email=j.smith@test.com.
The example link looks like this:
https://secure.livechatinc.com/licence/13017213/v2/open_chat.cgi?email=j.smith@test.com
If you would like to include both name and email, you should separate the parameters by &. The example link loading name and email looks like this:
https://secure.livechatinc.com/licence/13017213/v2/open_chat.cgi?name=John%20Smith&email=j.smith@test.com
Group ID
If there is no group ID parameter added to the direct chat link, the LiveChat chat widget loads the default group that is set in your Routing Rules. Usually it is the General group.
To make a different group load into the chat widget, we would need to add the group= parameter with the respective ID. Your groups' IDs can be found in the Team section > Groups tab of your LiveChat agent application. The group ID is displayed in the Details on the right once you click on a certain group.
The example link loading group ID 2 looks like this:
https://secure.livechatinc.com/licence/13017213/v2/open_chat.cgi?group=2
Unique groups settings
If a chat was started in one group of your LiveChat, once the customer goes to some other page where a different group should be loaded, the chat is not transferred to that group but still continues as there were no group change. It prevents the customer from losing the connection with agent during pages browsing. However, if you would like to make the connection to be closed and a new chat widget session with a proper group to be always loaded, you need to add the unique_groups=1 parameter to your direct chat link.
The example link with the unique groups setting and group ID looks like this:
https://secure.livechatinc.com/licence/13017213/v2/open_chat.cgi?group=2&unique_groups=1
Custom variables
Custom variables can be loaded into your chat widget and direct chat link by adding the params= parameter to it. It is also presented in our LiveChat Help Center custom variables guide.
The custom variables need to be also properly encoded in the same way as the customer name. If you are not familiar with URL encoding you could use some online encoder, for example https://www.browserling.com/tools/url-encode.
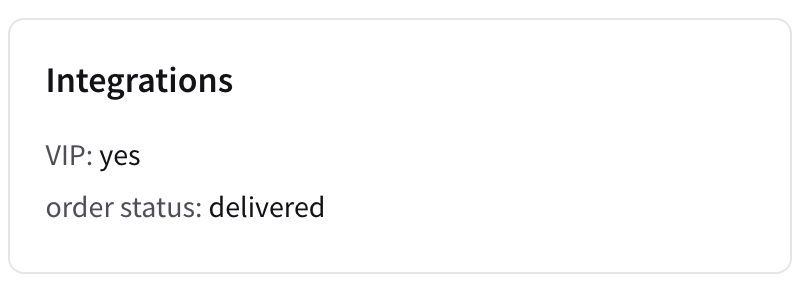
Let's load 2 custom parameters. We would like to inform the agent that our customer is VIP and his order status is delivered. Our final parameter is params=VIP%3Dyes%26order%20status%3Ddelivered. Notice that names and values of custom variables are separated by %3D and the variables are separated by %26. You would need to add %26 before each custom variable you would like to add.
The example link with the unique groups setting and group ID looks like this:
https://secure.livechatinc.com/licence/13017213/v2/open_chat.cgi?params=VIP%3Dyes%26order%20status%3Ddelivered
Custom variables are displayed as Integrations in the Details section of the ongoing chats.
Loading many custom parameters and variables together at once
You can add many variables and parameters to your direct chat page link. However, to make sure they will all work together as expected, please add them in the following order:
- Group ID
- Unique groups
- Customer name
- Customer email
- Custom variables
Not all of the parameters have to be added together so you can only include the ones you need.
If you would like to load group 2, John Smith name, j.smith@test.com email, VIP yes and order status delivered your link should look like this:
https://secure.livechatinc.com/licence/13017213/v2/open_chat.cgi?group=2&name=John%20Smith&email=j.smith@test.com¶ms=VIP%3Dyes%26order%20status%3Ddelivered
If you have any questions, let us know!
Yours, LiveChat Team <3