Filter your story with LiveChat Custom Variables
Hello! 👋 This guide explains on how to make your ChatBot story to execute different blocks and flows depending on some custom values loaded from your website using the LiveChat integration.
Let’s say that your website defines the following variables and their values. It stores that info for the logged in users - different for each of the customers.
The below variables are only the example. Different websites store information in different ways.
<script>
var account_type = "Premium";
var user_id = "XYZ12345";
var is_test = true;
</script>
Our example website keeps the information about the account_type (f.e. premium, VIP, gold, silver, normal etc.), user_id (can be a string of signs or some number) and the information is_test which states if the account is the testing one or not (true/false - boolean).
To make those values loaded to our LiveChat chat widget we need to use the JS API method called Set_Session_Variables or Custom Variables. Remember please that additional script loading Custom Variables should be executed after the chat widget is loaded.
For example:
<!-- Start of LiveChat (www.livechat.com) code -->
<script>
    window.__lc = window.__lc || {};
    window.__lc.license = XXXXX;
    ;(function(n,t,c){function i(n){return e._h?e._h.apply(null,n):e._q.push(n)}var e={_q:[],_h:null,_v:"2.0",on:function(){i(["on",c.call(arguments)])},once:function(){i(["once",c.call(arguments)])},off:function(){i(["off",c.call(arguments)])},get:function(){if(!e._h)throw new Error("[LiveChatWidget] You can't use getters before load.");return i(["get",c.call(arguments)])},call:function(){i(["call",c.call(arguments)])},init:function(){var n=t.createElement("script");n.async=!0,n.type="text/javascript",n.src="https://cdn.livechatinc.com/staging/tracking.js",t.head.appendChild(n)}};!n.__lc.asyncInit&&e.init(),n.LiveChatWidget=n.LiveChatWidget||e}(window,document,[].slice))
</script>
<noscript><a href="https://www.livechat.com/chat-with/XXXXX/" rel="nofollow">Chat with us</a>, powered by <a href="https://www.livechat.com/?welcome" rel="noopener nofollow" target="_blank">LiveChat</a></noscript>
<!-- End of LiveChat code -->

<!--Start of Custom Variables code -->
<script>
LiveChatWidget.call("set_session_variables", {
  AccountType: account_type,
  UserId: user_id,
  IsTest: is_test,
});
</script>
<!--End of Custom Variables code →
The above Custom Variables code creates 3 LiveChat Custom Variables named: AccountType, UserId and IsTest. They take the value of the following variables loaded from the example website - account_type, user_id and is_test.
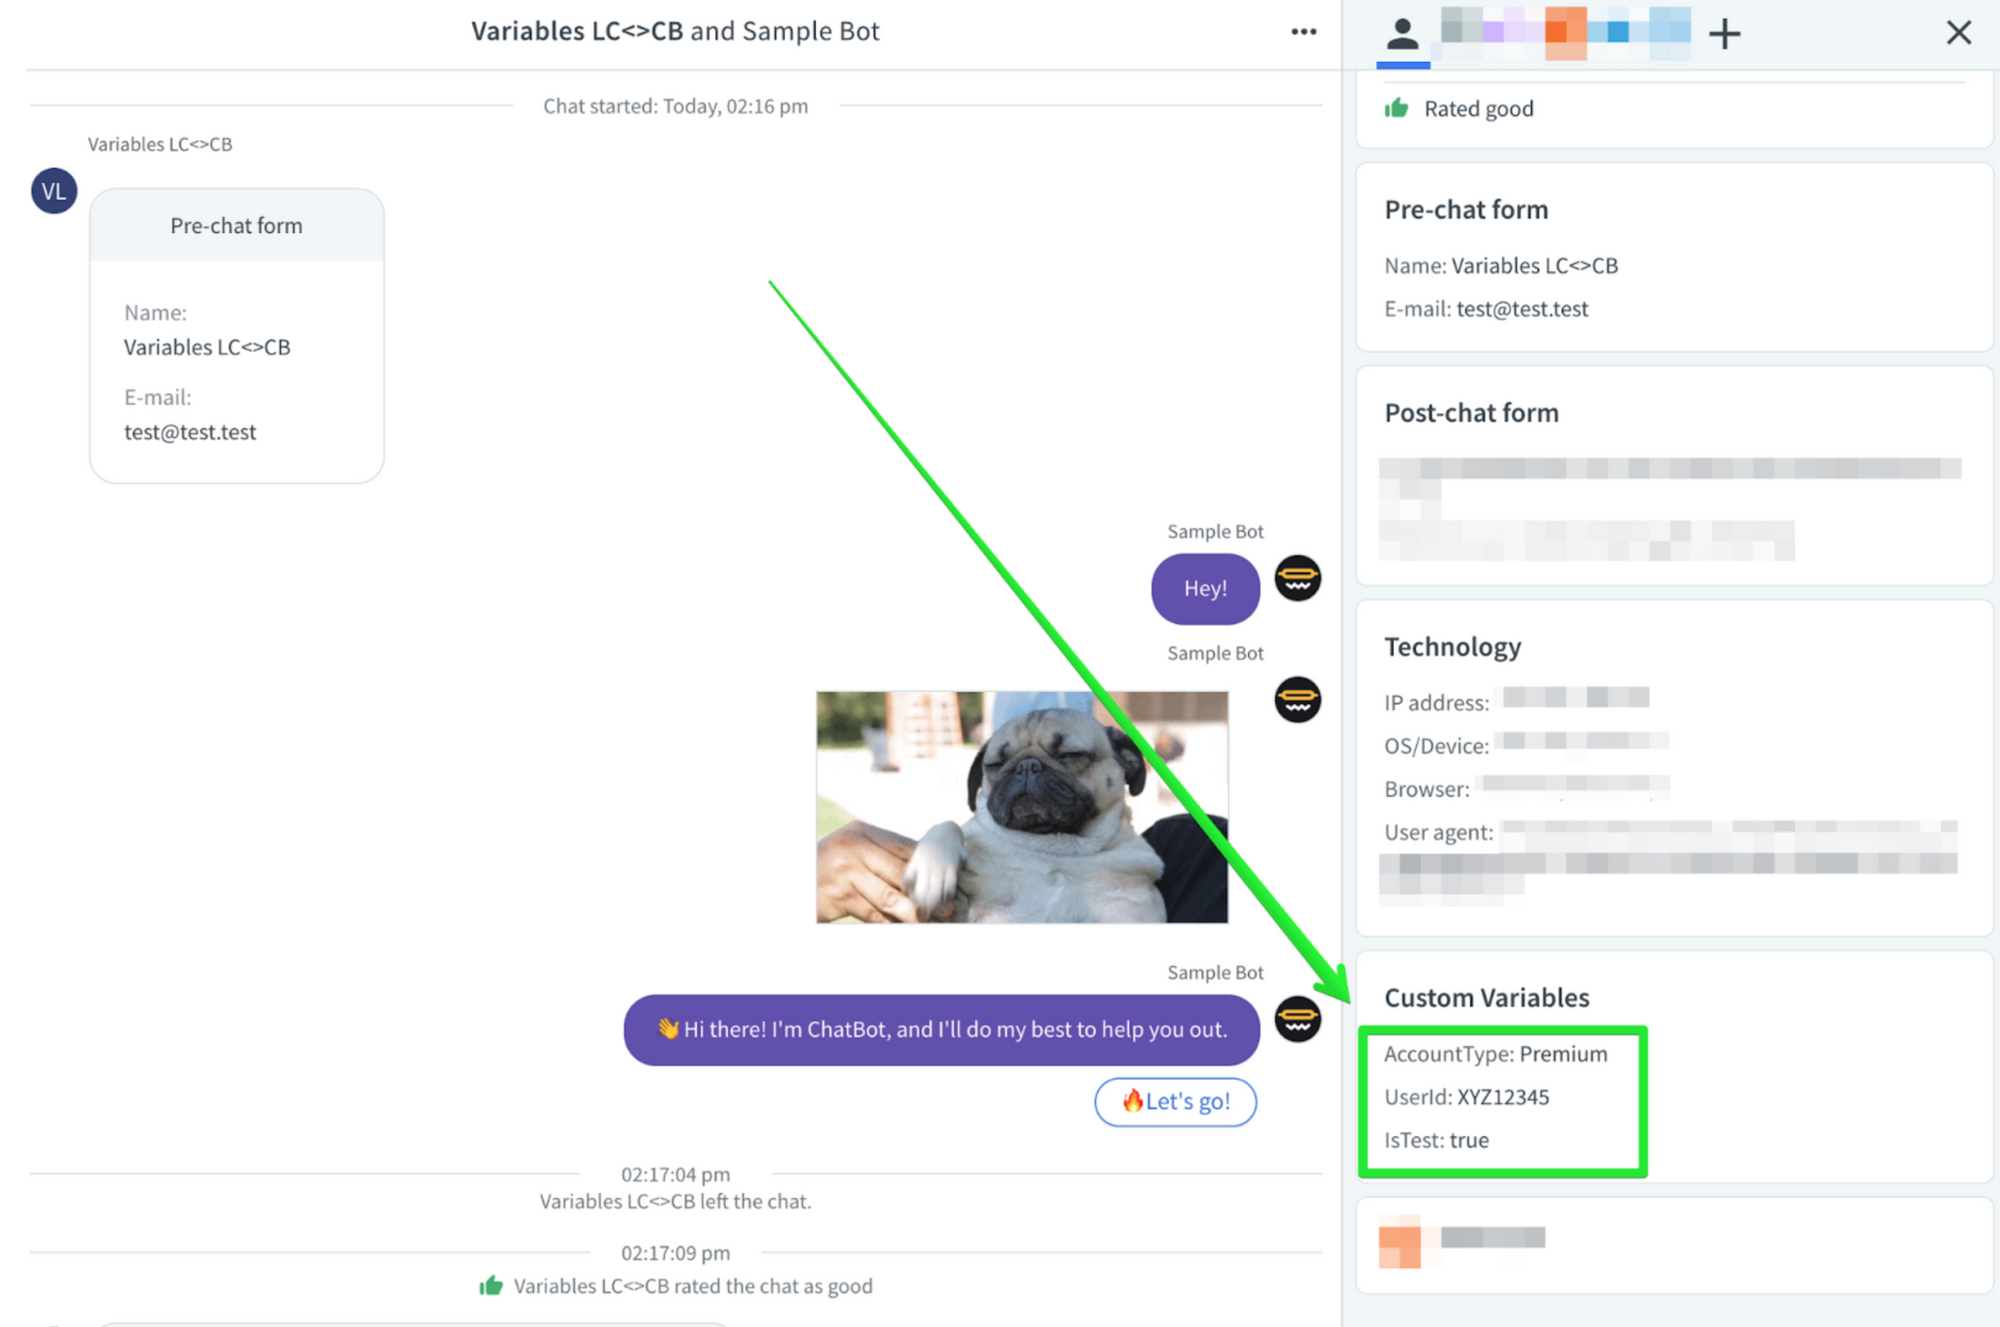
The below screenshot presents how the mentioned Custom Variables are displayed in the LiveChat agent application - Chats section, and what values are loaded for them from the website.

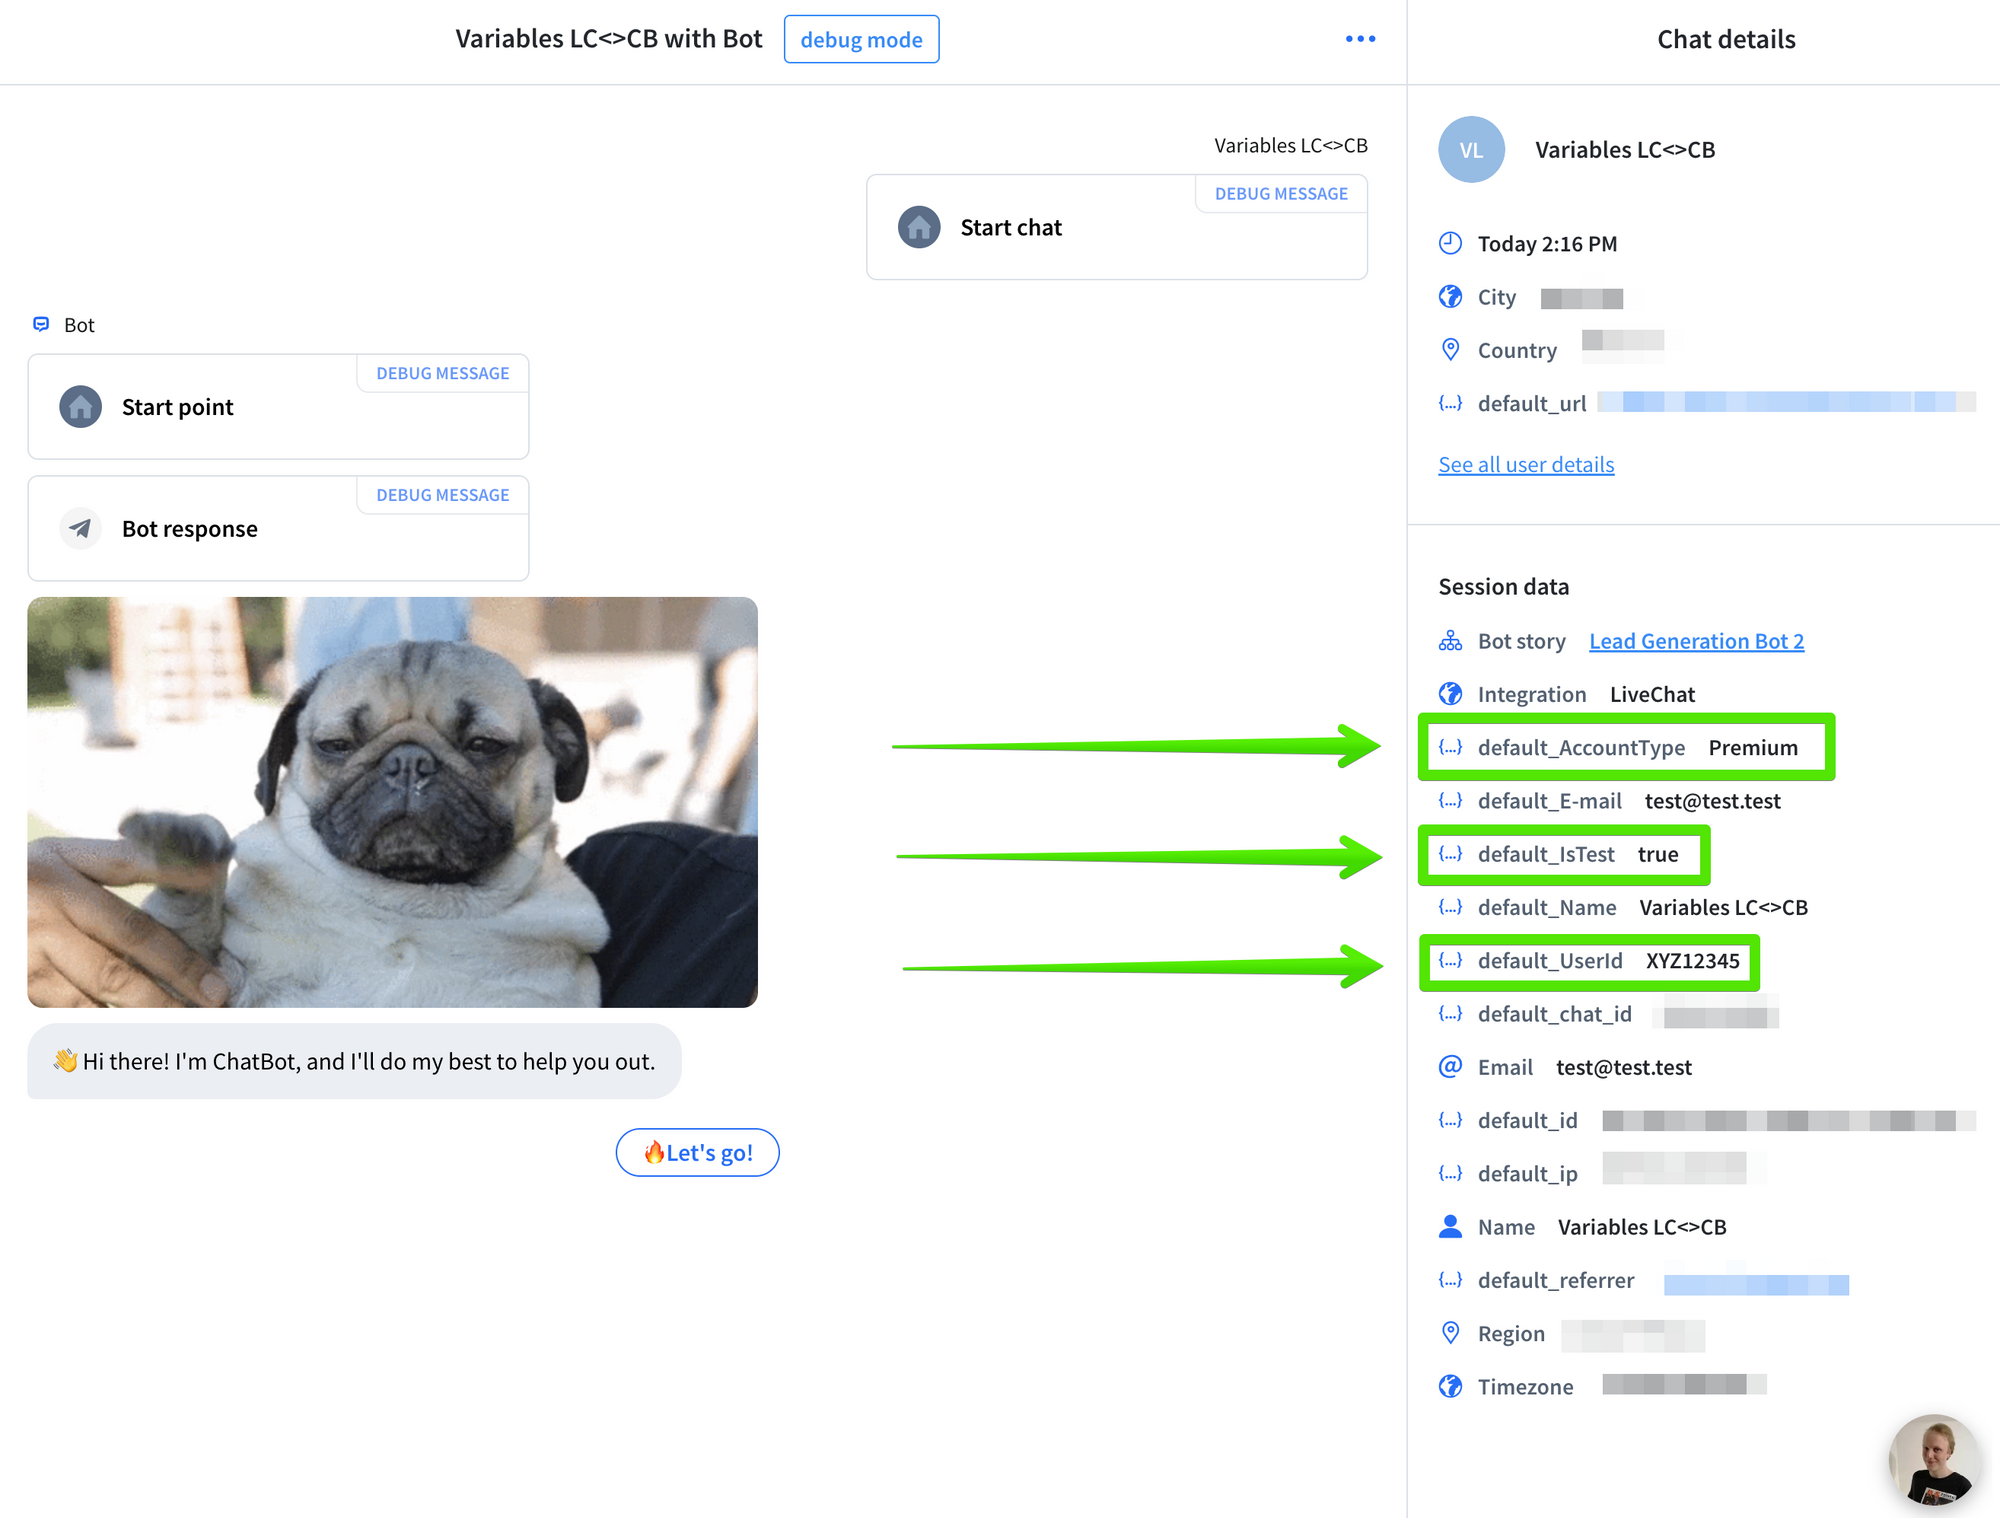
Here you can see how the mentioned Custom Variables are loaded into the ChatBot. Among others, they can be found in the ChatBot.com application Archives section for a certain chat.

We can see that LiveChat Custom Variables are saved in your ChatBot as default_<CustomVariableName>.
Hence the Custom Variable AccountType is loaded to ChatBot as the Custom Attribute named default_AccountType. You do not need to add the Set Attribute block to create the mentioned custom attributes. They are created automatically once loaded from LiveChat.
The Custom Variables are forwarded to your ChatBot only once, when the chat is started. Make sure that the proper variable values are loaded before the chat starts.
The information from the LiveChat Pre-chat Form are also forwarded to your ChatBot in the same way. In the above example we can see default_Name and default_E-mail , provided via the LiveChat Pre-chat Form. You could also use them to filter your ChatBot story if needed.
The below video will guide you on how to set your ChatBot story using Filter blocks to change its flow depending on the implemented Custom Variables - Custom Attributes:
If you had any questions, let us know in the Community thread!
Yours, LiveChat Team <3