Filtering your story with time
Hello! :) This guide explains on how to make your ChatBot story to trigger different blocks depending on what hour and day of the week it is for some given timezone.
The method can be useful for the cases in which we do not want the ChatBot to check if there is agent available using the Transfer Chat block or if we want to make it simply say “Good evening!” instead of “Hi!”. The following example will present the second use-case. We will describe the example codes for the LiveChat integration and the native ChatBot Chat Widget.
Below you will find two workflows:
- LiveChat - ChatBot integration (using LiveChat chat widget)
- ChatBot Chat Widget (using native ChatBot widget without the integration with LiveChat)
LiveChat - ChatBot integration (using LiveChat chat widget)
To gather the information about the current time and weekday we will use the following JS script:
<script>
const date = new Date();
const timezone = 'America/New_York'
const optionsDay = { weekday: 'long', timeZone: timezone};
const optionsHour = { hour: 'numeric', timeZone: timezone};
const cbday = date.toLocaleDateString('en-EN', optionsDay);
const cbhour = Number(date.toLocaleString('en-GB', optionsHour));
console.log(cbday+' '+cbhour+'h')
</script>
The only part of the above code that you need to adjust on your side is the timezone. Please change the ‘America/New_York’ to any timezone needed. Remember to use the “TZ database name” format of it - list of timezones. The timezone is not dynamic but will always load the time of one certain place no matter what is the timezone of the visitor’s device.
Once our website obtains the two variables cbday and cbhour we need to make our LiveChat to load the data to the chat widget. In order to achieve it we will use the following code:
<script>
  function onReady(initialData){
  LiveChatWidget.call("set_session_variables", {
  Day: cbday,
  Hour: cbhour,
});
  }
LiveChatWidget.on('ready', onReady)
</script>
We have used here the onReady callback function and the Custom Variables code to load the proper variables into the chat widget. The onReady callback makes sure the variables are only forwarded once our LiveChat tracking JS is already loaded.
The complete code including the LiveChat chat widget snippet may look like this (XXXX is your LiveChat license ID):
<script>
const date = new Date();
const timezone = 'America/New_York'
const optionsDay = { weekday: 'long', timeZone: timezone};
const optionsHour = { hour: 'numeric', timeZone: timezone};
const cbday = date.toLocaleDateString('en-EN', optionsDay);
const cbhour = Number(date.toLocaleString('en-GB', optionsHour));
console.log(cbday+' '+cbhour+'h')
</script>

<!-- Start of LiveChat (www.livechat.com) code -->
<script>
    window.__lc = window.__lc || {};
    window.__lc.license = XXXXX;
    ;(function(n,t,c){function i(n){return e._h?e._h.apply(null,n):e._q.push(n)}var e={_q:[],_h:null,_v:"2.0",on:function(){i(["on",c.call(arguments)])},once:function(){i(["once",c.call(arguments)])},off:function(){i(["off",c.call(arguments)])},get:function(){if(!e._h)throw new Error("[LiveChatWidget] You can't use getters before load.");return i(["get",c.call(arguments)])},call:function(){i(["call",c.call(arguments)])},init:function(){var n=t.createElement("script");n.async=!0,n.type="text/javascript",n.src="https://cdn.livechatinc.com/tracking.js",t.head.appendChild(n)}};!n.__lc.asyncInit&&e.init(),n.LiveChatWidget=n.LiveChatWidget||e}(window,document,[].slice))
</script>
<noscript><a href="https://www.livechat.com/chat-with/XXXXX/" rel="nofollow">Chat with us</a>, powered by <a href="https://www.livechat.com/?welcome" rel="noopener nofollow" target="_blank">LiveChat</a></noscript>
<!-- End of LiveChat code -->

<script>
  function onReady(initialData){
  LiveChatWidget.call("set_session_variables", {
  Day: cbday,
  Hour: cbhour,
});
  }
LiveChatWidget.on('ready', onReady)
</script>
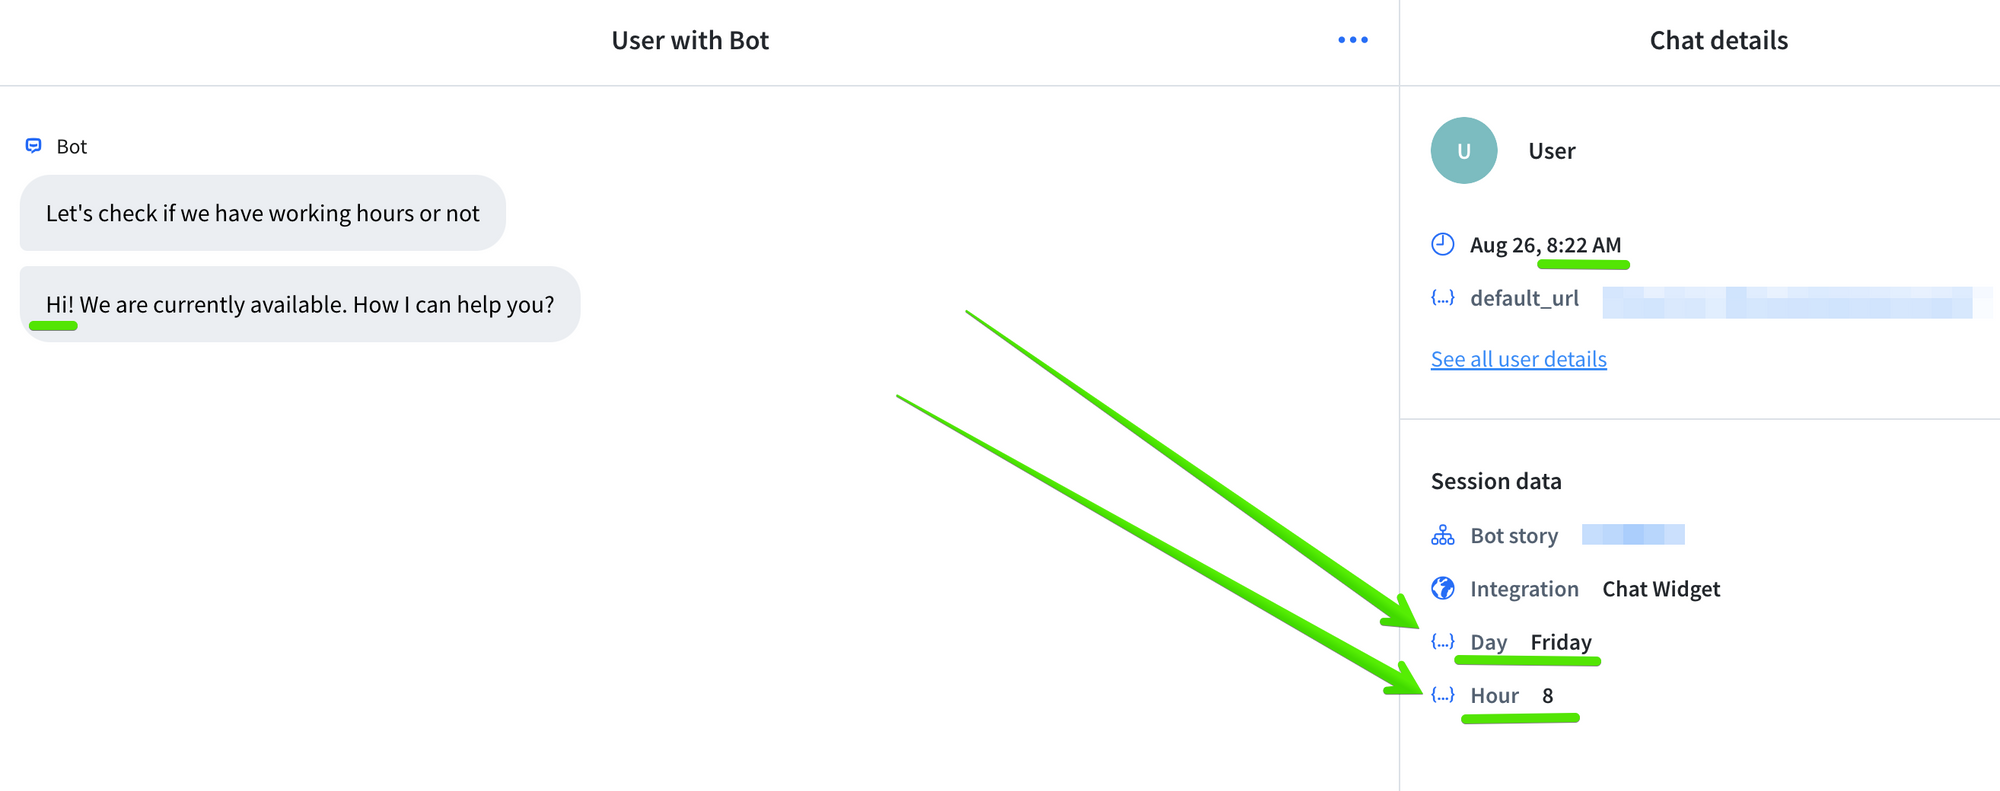
Below we can see what the Custom Variables Day and Hour look like in our LiveChat Archives. The code is set to provide the integers - hence for 11:37 PM the variable value is 23.
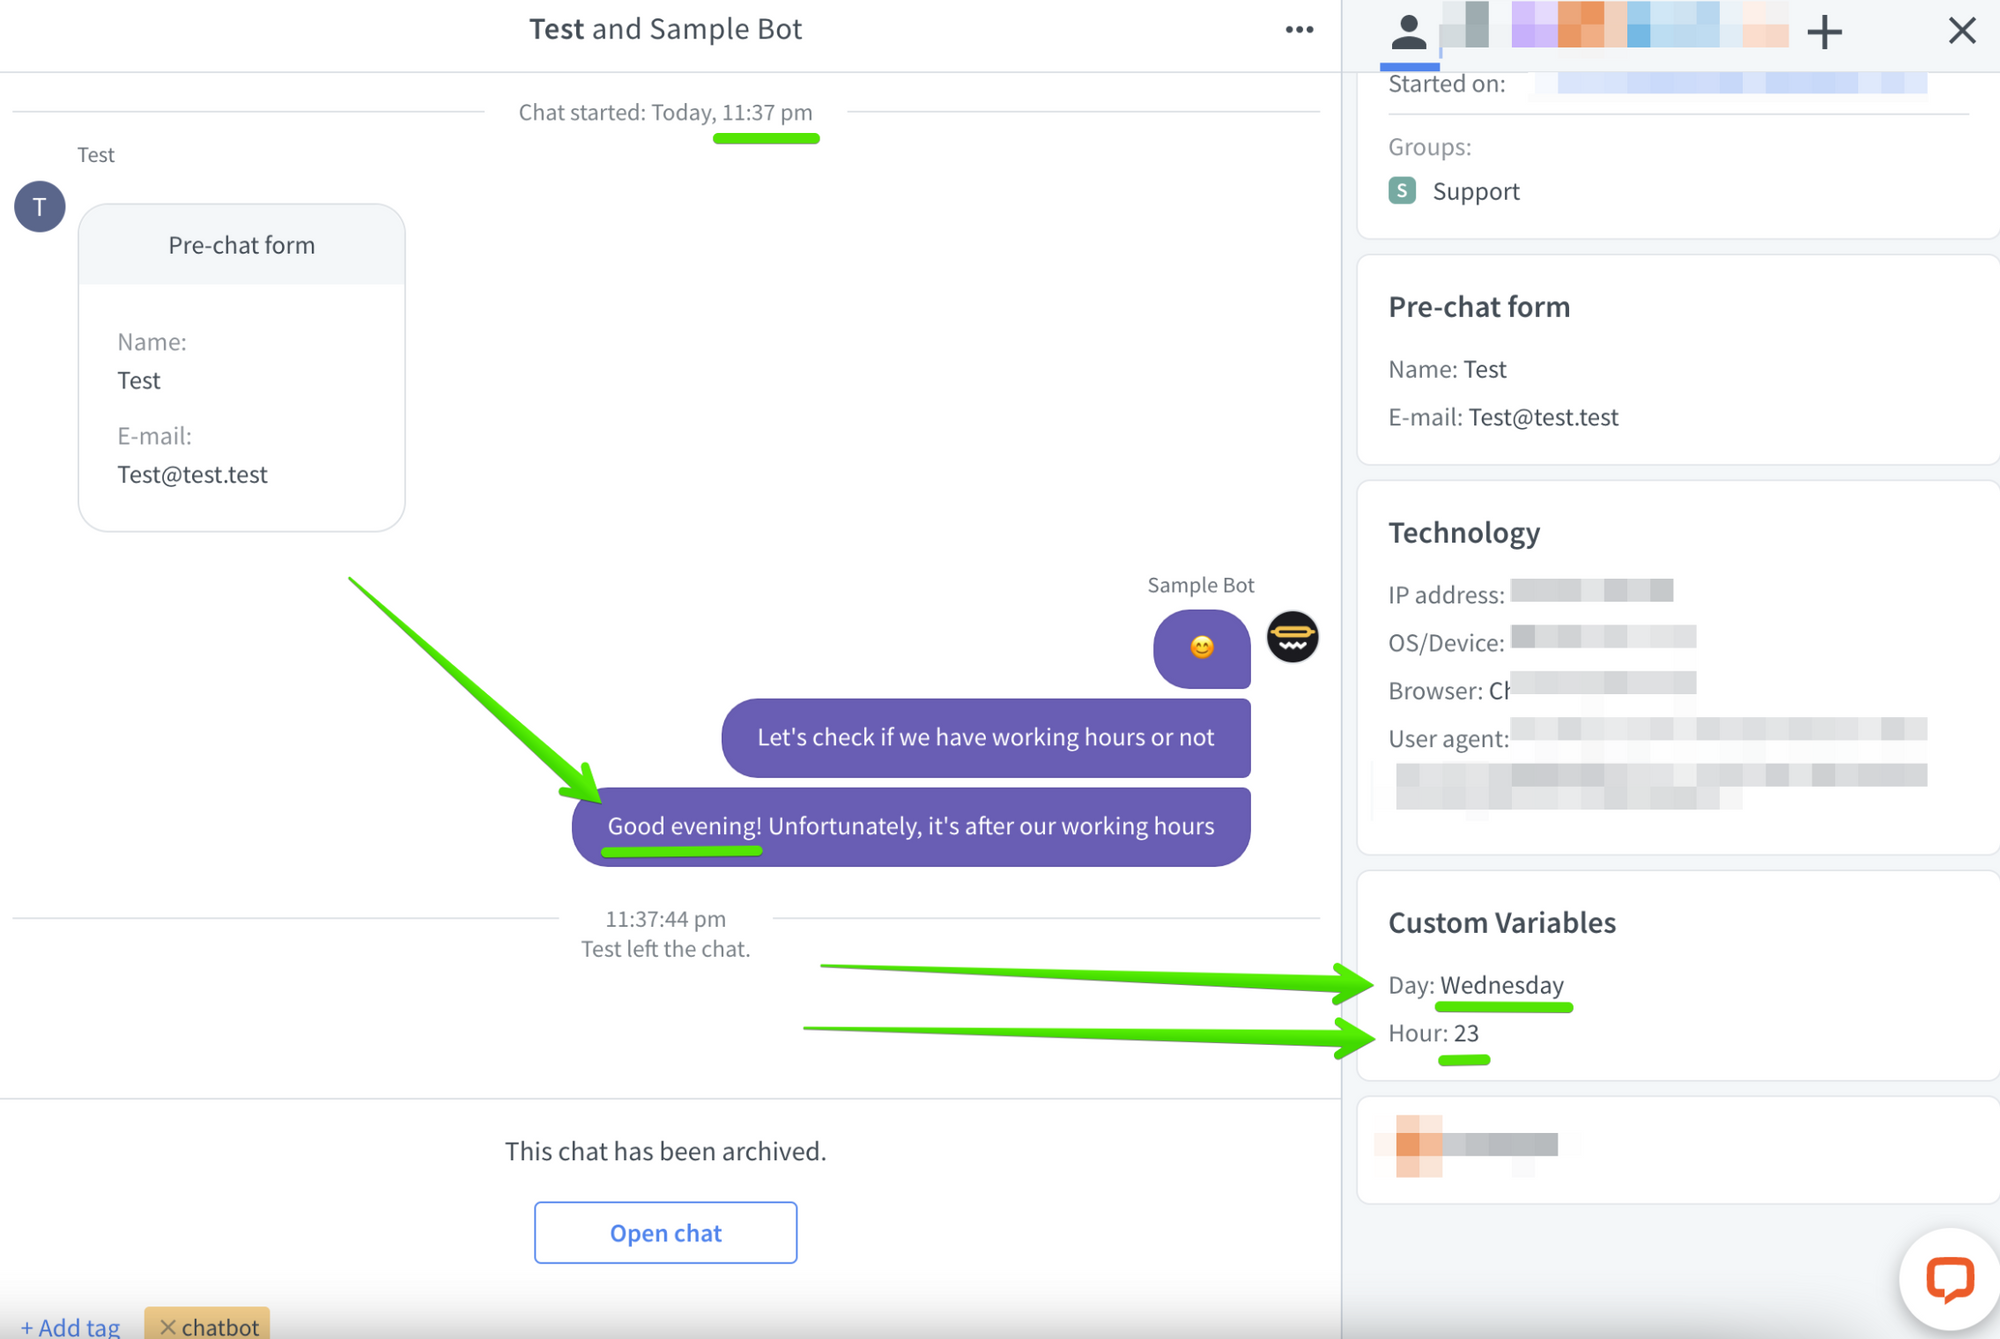
The ChatBot’s response is “Good Evening!” as expected for the evening hours in the set timezone.
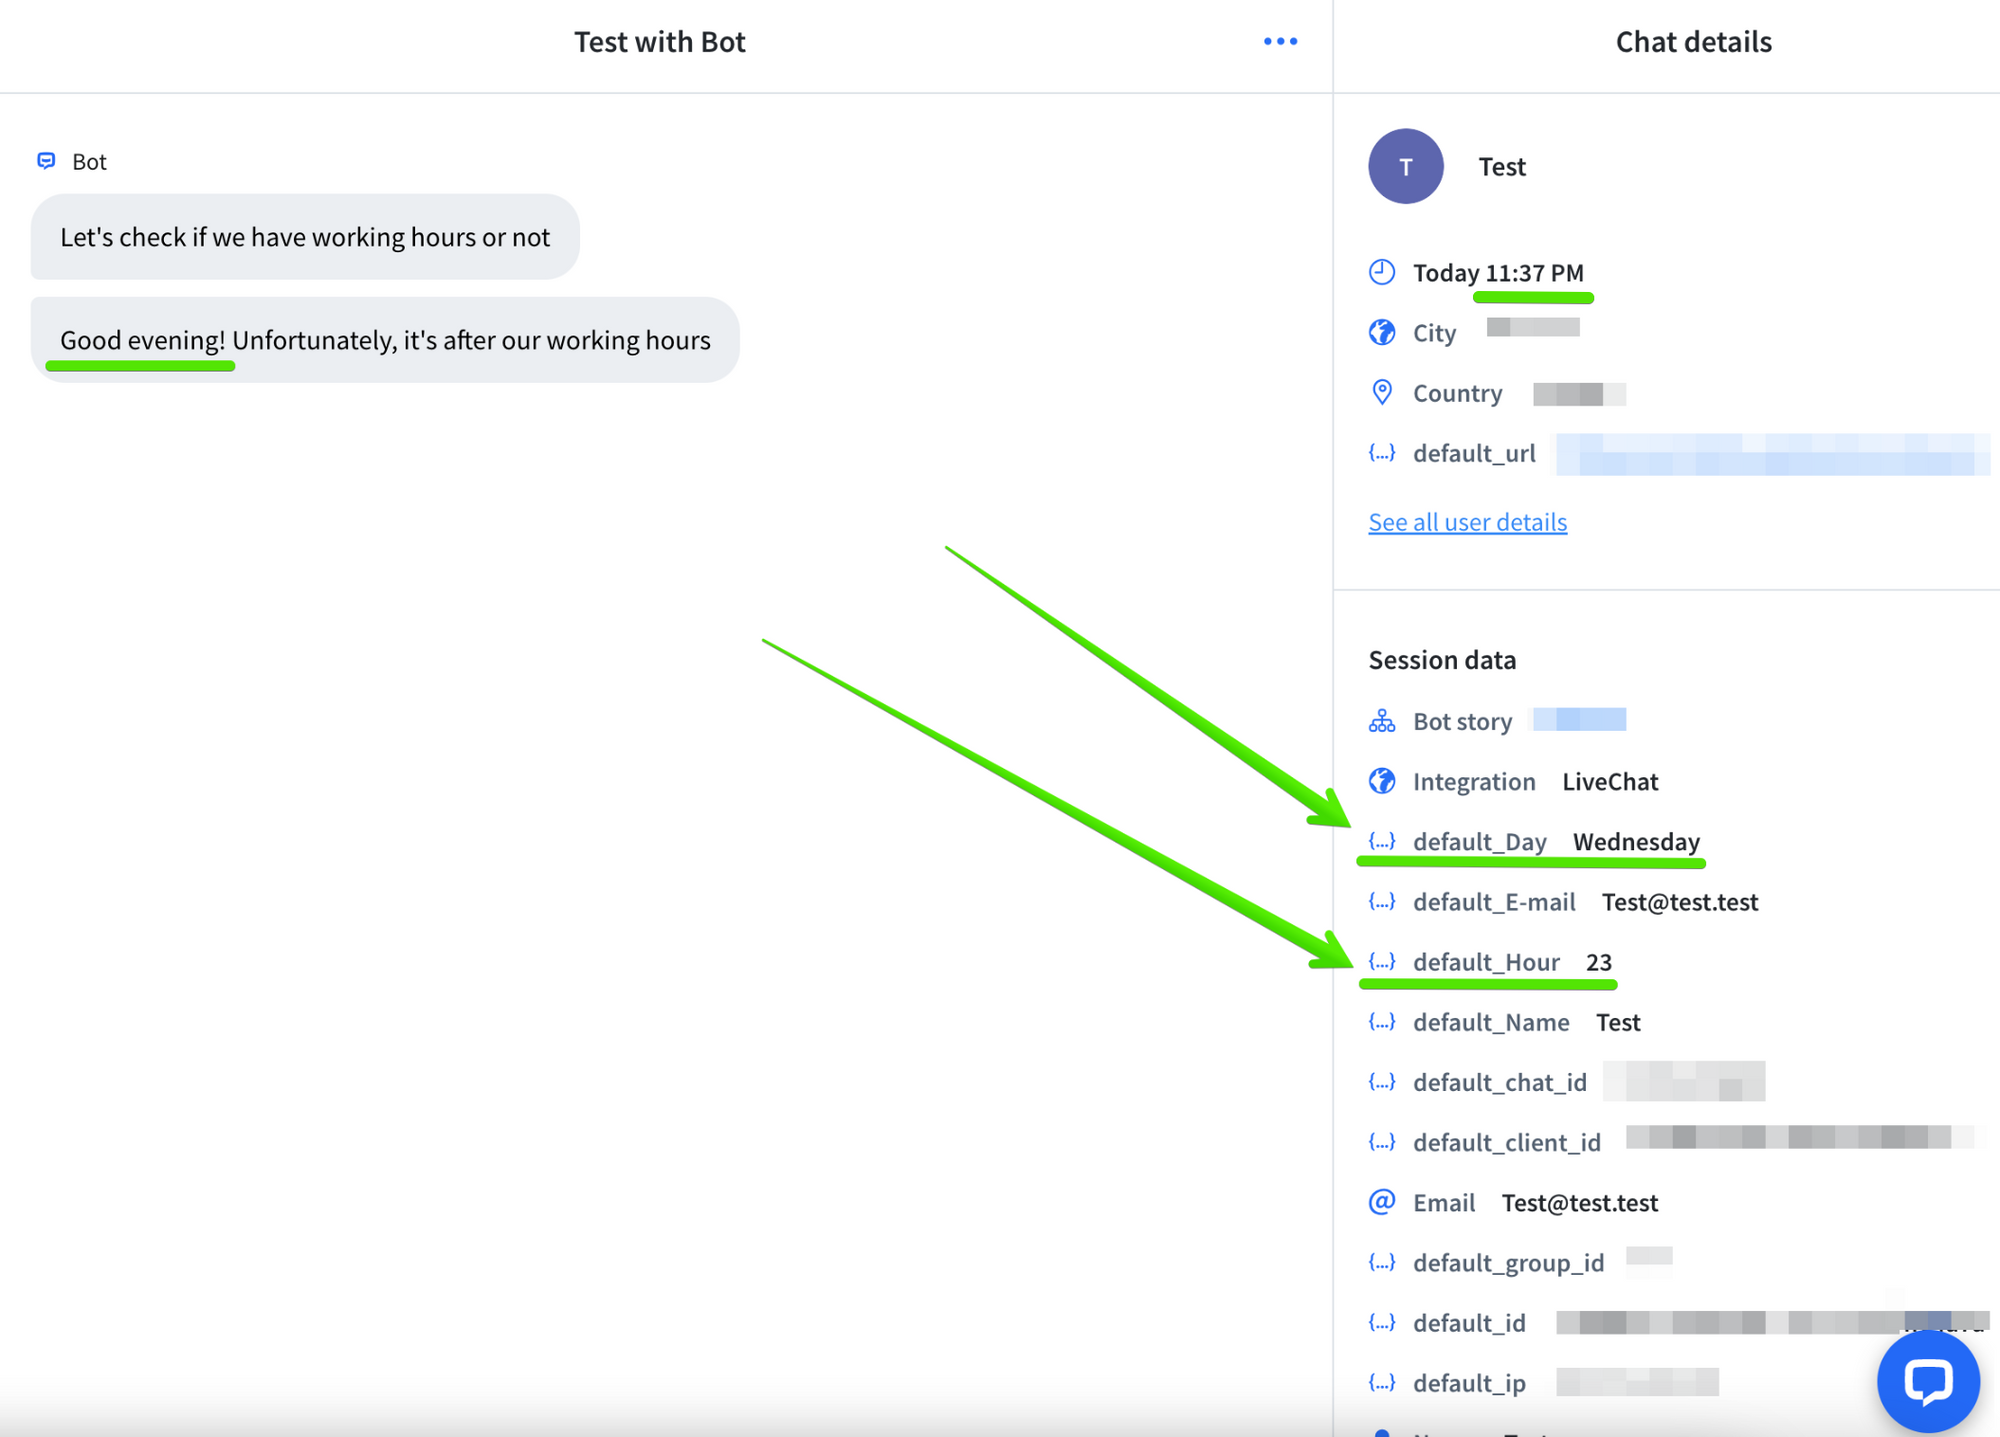
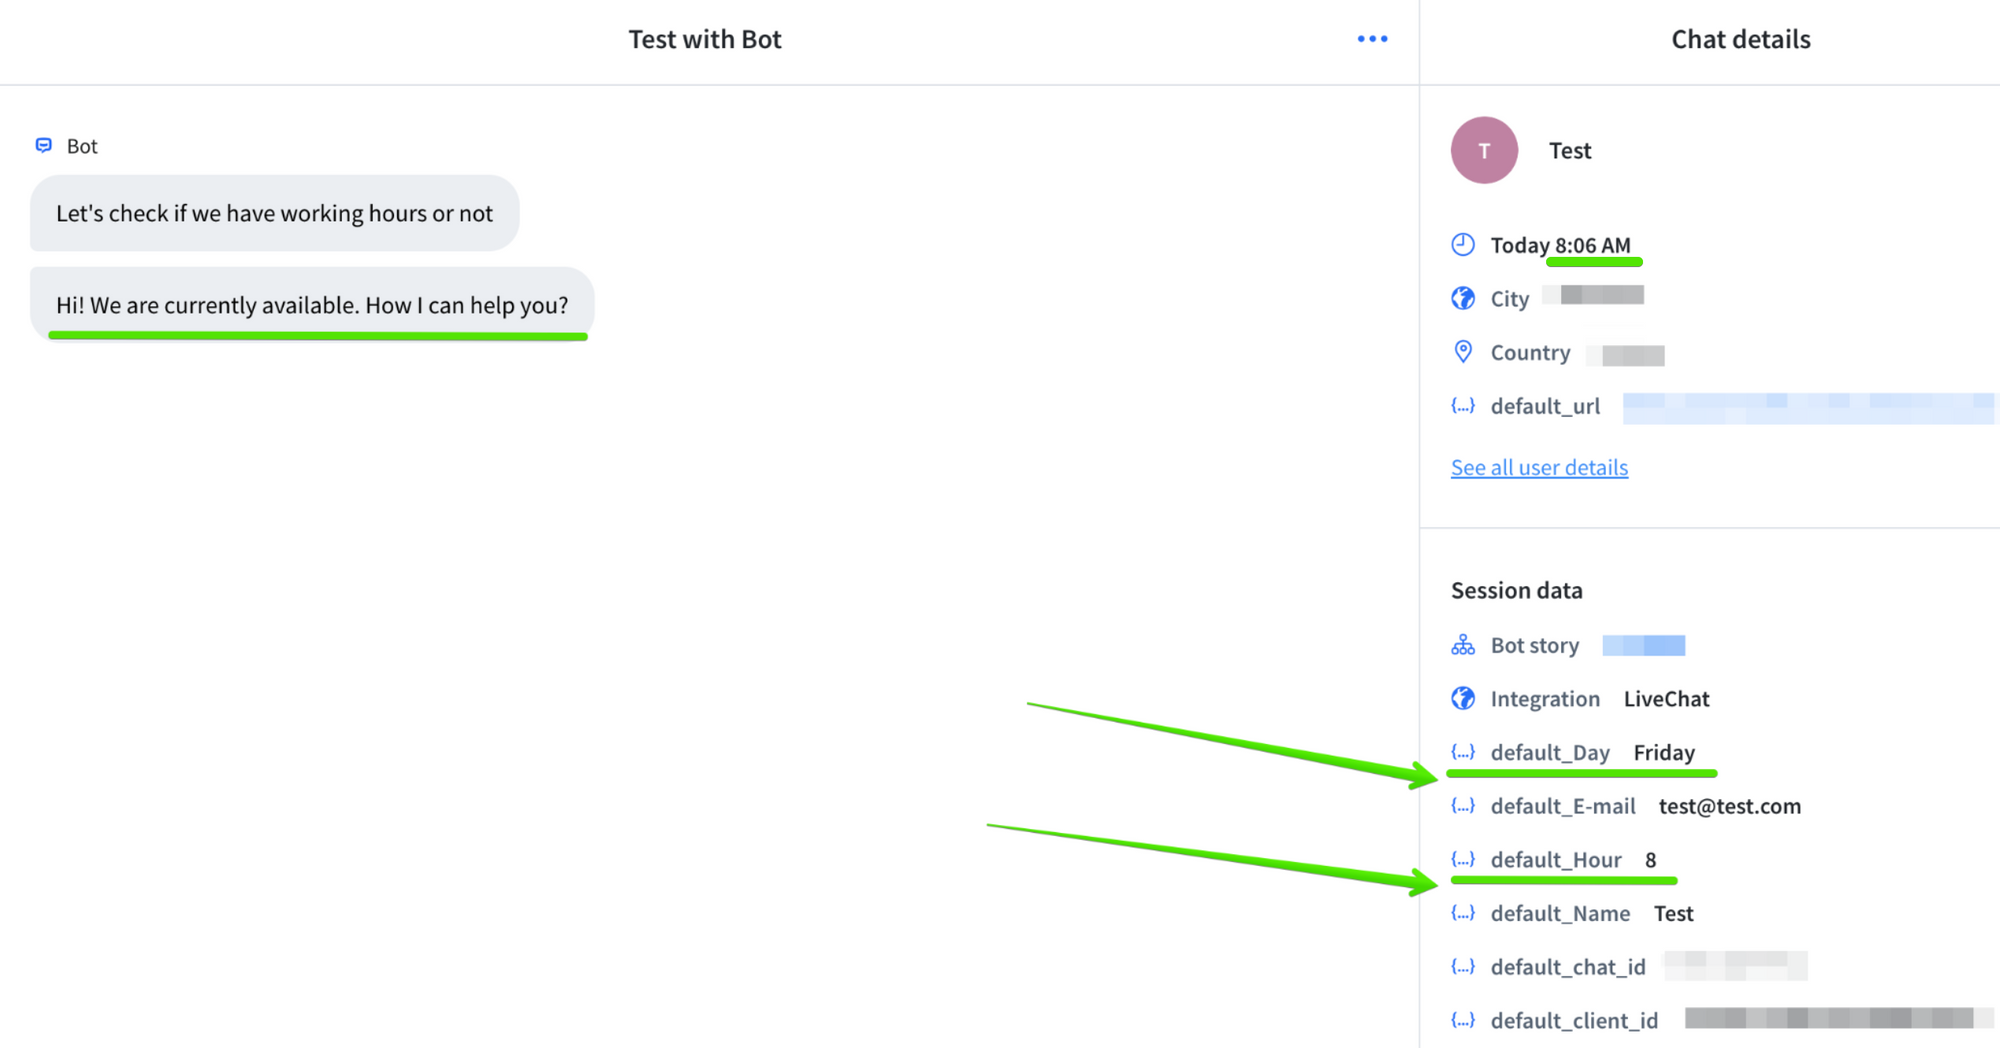
On the ChatBot application side, the variables are already transformed into the custom attributes. Their names change as the “default_” prefixes are added to them. We do not need to define our custom attributes names and values on the story builder level. They are already created and set once loaded from LiveChat.
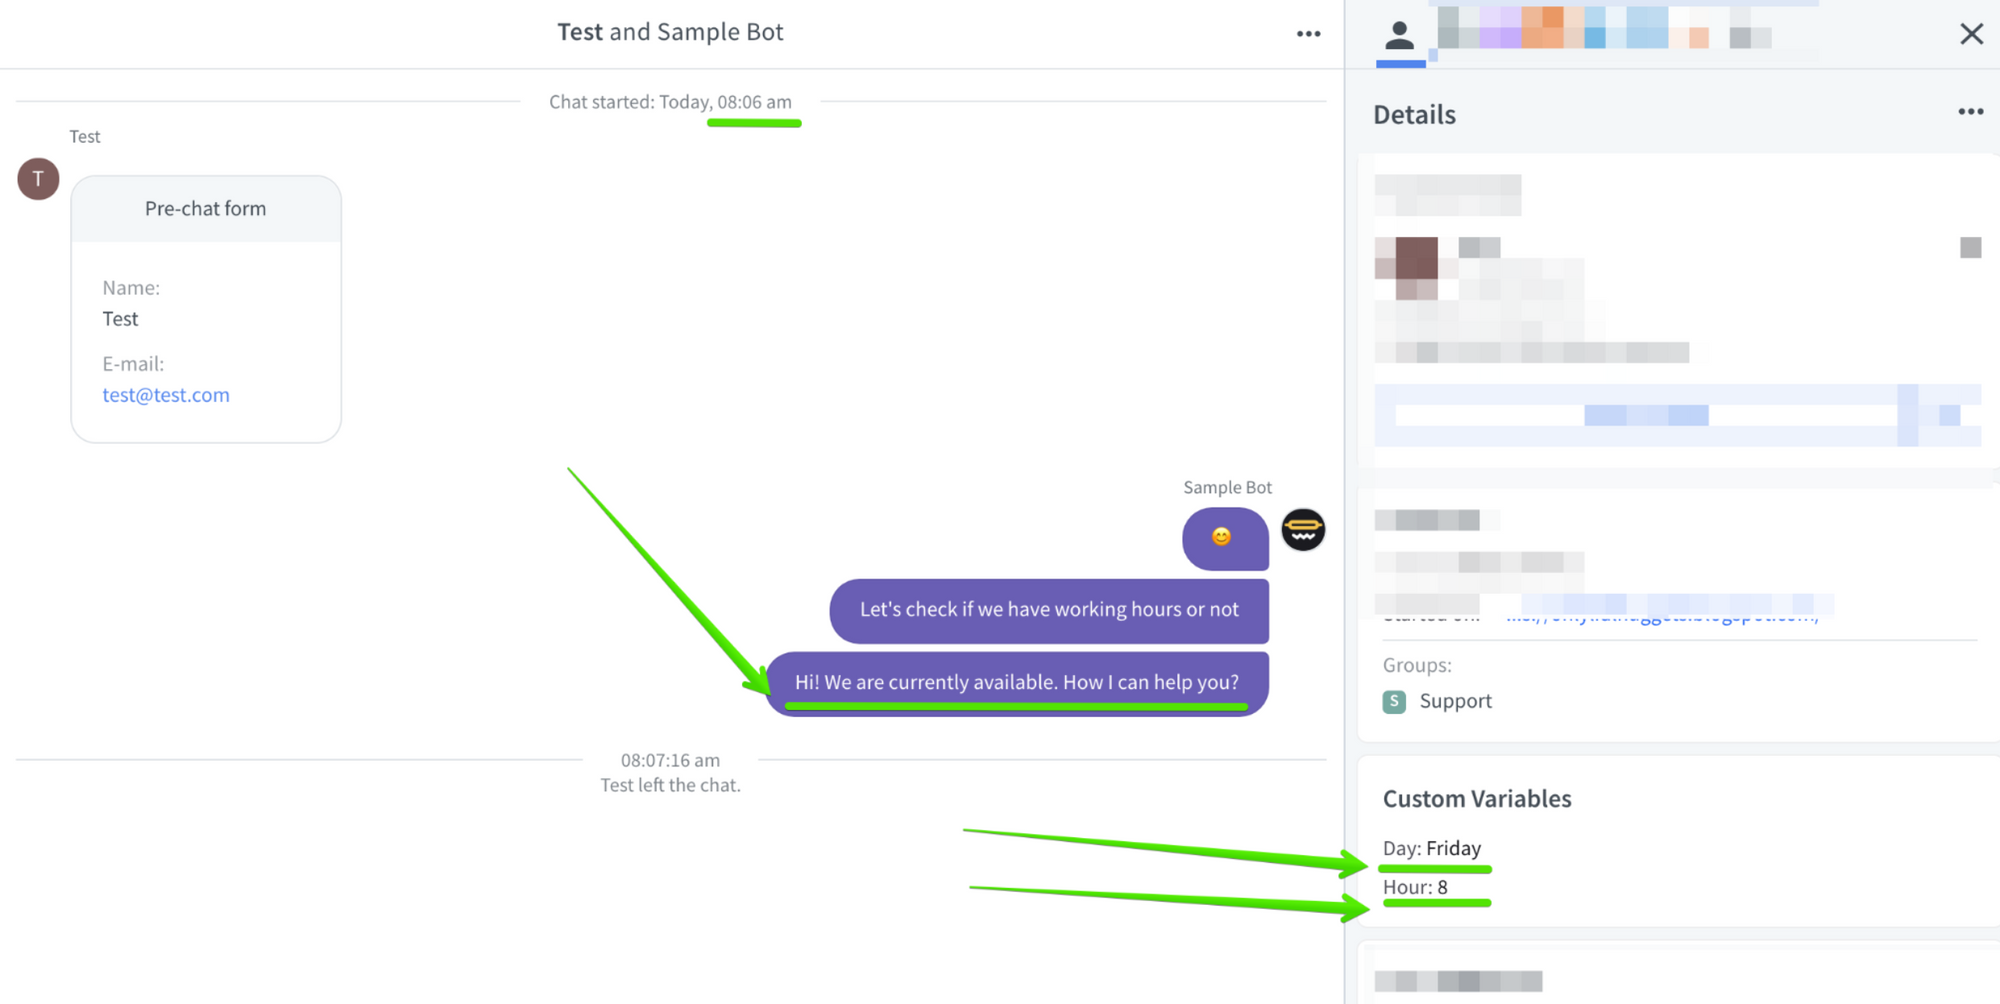
If filtered properly our ChatBot story responses “Hi!” for non-evening hours as expected.
Example story - video
The following video presents how to set the example story utilizing Filter blocks to display different bot responses based on the default_Hour custom variable.
ChatBot Chat Widget (using native ChatBot widget without integration with LiveChat)
To load the information about what day and time it is for a certain timezone we will use the very same code as in the previous example.
<script>
const date = new Date();
const timezone = 'America/New_York'
const optionsDay = { weekday: 'long', timeZone: timezone};
const optionsHour = { hour: 'numeric', timeZone: timezone};
const cbday = date.toLocaleDateString('en-EN', optionsDay);
const cbhour = Number(date.toLocaleString('en-GB', optionsHour));
console.log(cbday+' '+cbhour+'h')
</script>
The values and names of custom attributes will be loaded into the ChatBot Chat Widget using the setSessionAttributes ChatBot JS API method. It has onReady function already included and its code for our use-case will be:
<script>
    window.BE_API = window.BE_API || {};
    window.BE_API.onLoad = () => {
    window.BE_API.setSessionAttributes({
        Day: cbday,
        Hour: cbhour,
    })
};
</script>
The complete example code may look like this (XXXX is your ChatBot story code ID):
<script>
const date = new Date();
const timezone = 'America/New_York'
const optionsDay = { weekday: 'long', timeZone: timezone};
const optionsHour = { hour: 'numeric', timeZone: timezone};
const cbday = date.toLocaleDateString('en-EN', optionsDay);
const cbhour = Number(date.toLocaleString('en-GB', optionsHour));
console.log(cbday+' '+cbhour+'h')
</script>

<!-- Start of ChatBot (www.chatbot.com) code -->
<script type="text/javascript">
    window.__be = window.__be || {};
    window.__be.id = "XXXXX";
    (function() {
        var be = document.createElement('script'); be.type = 'text/javascript'; be.async = true;
        be.src = ('https:' == document.location.protocol ? 'https://' : 'http://') + 'cdn.chatbot.com/widget/plugin.js';
        var s = document.getElementsByTagName('script')[0]; s.parentNode.insertBefore(be, s);
    })();
</script>
<!-- End of ChatBot code →

<script>
    window.BE_API = window.BE_API || {};
    window.BE_API.onLoad = () => {
    window.BE_API.setSessionAttributes({
        Day: cbday,
        Hour: cbhour,
    })
};
</script>
As the attributes are not forwarded from the LiveChat integration their names are exactly the same as the ones set for them in the setSessionAttributes code. You should use those names when you choose what attribute to filter with your Filter blocks.
The following video presents how to set the example story utilizing Filter blocks to display different bot responses based on the default_Hour custom variable.
Please let us know in case of any further questions or doubts! We will be happy to help!
Yours, LiveChat Team <3